
Belaying
Did you know Baylor University has a rock-climbing wall? If you have been to the Student Life Center, there is no way you missed it. Shoes and harnesses are free to rent, so any and every student can give it a try!

However, if you are interested in going with a partner, it is important that both of you know how to belay beforehand. A belayer oversees the rope attached to the climber and prevents injuries. This skill is essential to understand for your first climbing session to ensure both you and your partner’s safety.
There are four steps (or as I like to call it -- the four C’s) in proper belaying technique:
Check
Communicate
Catch
Coast
Step One: Check
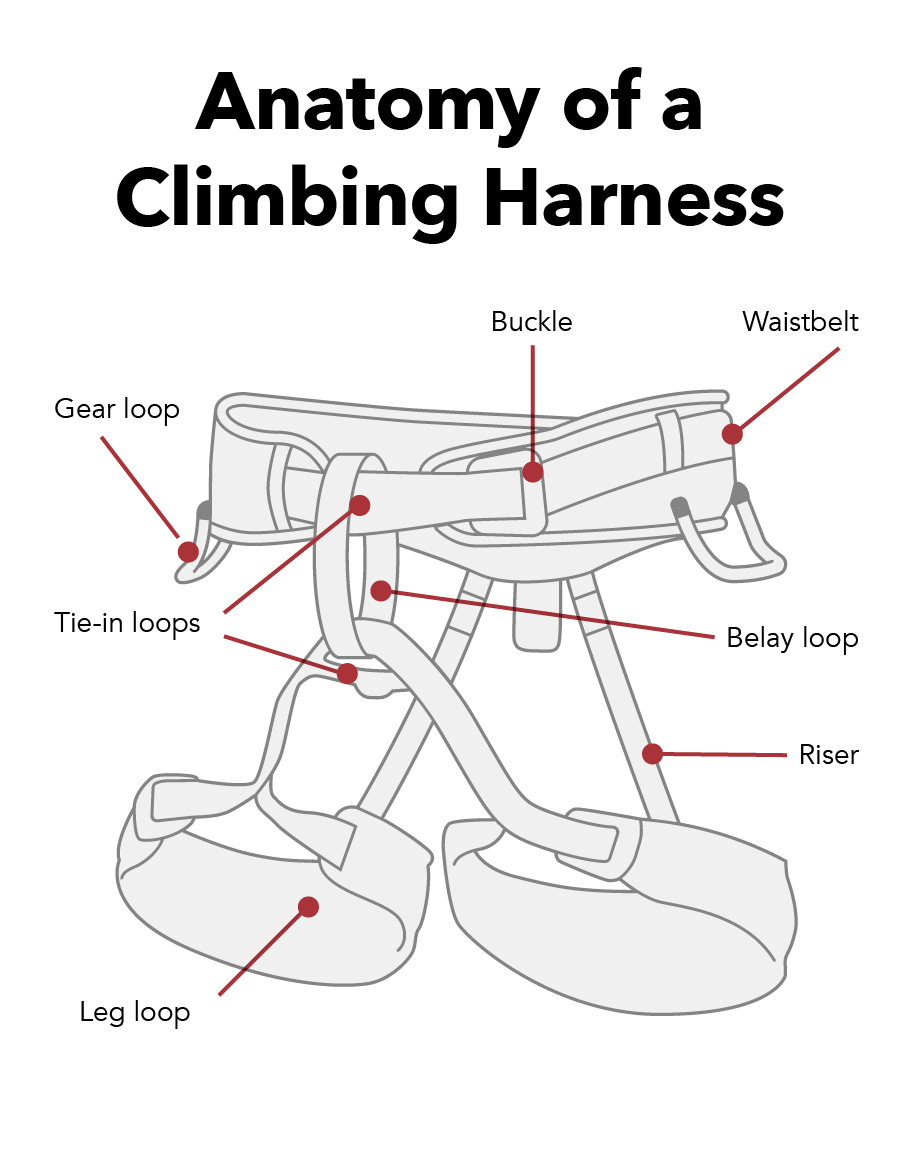
Before a climber attempts a route, the belayer must check the rope, the climber, and the belay device. First, both partners examine the rope for any tearing or fraying, as this is a sign it needs to be replaced. Then, the belayer reviews their partner’s harness. It should be high and tight (in other words – if they were to tug on the waistbelt or leg loops, they should remain snug and secure on the body) and free of any twisting. The climber should also be attached to the rope using a figure-eight follow-through knot, (there are so many great resources for learning this knot – my favorite is on REI’s website) which is perfected when the rope runs through both tie-in loops and there are five sets of parallel lines visible.
Next, the belay device is assessed carefully. The rope should be threaded through the device and attached to a self-locking carabiner. The carabiner should then be attached to the belayer’s top tie-in loop on their harness.

Step Two: Communicate
Throughout this whole process, communication is key. Before the climber’s ascent, the climber should ask, “On belay?” When ready, the belayer should answer “Belay on.” This conversation informs the climber that the belayer has finished setting up their device and will be ready to catch them. To follow up, the climber will say, “Climbing.” This alerts the belayer that their partner is going to begin climbing, and they will respond with “Climb on.” There are several other important commands including “Slack” (more rope) and “Take” (remove all excess rope). Now you are ready to climb!

Step Three: Catch
To effectively belay a climber, a belayer must understand the PBUS (Pull, Brake, Under, Slide) technique. This involves the use of both brake and guiding hands. The brake hand (dominant hand) is placed six inches below the belay device (and should remain there to avoid pinching). The guide hand (opposite hand) is placed on the climber’s side of the rope. First, the belayer pulls the rope held by the guiding hand down while simultaneously pulling the rope held by the brake hand up and out. Once the guiding hand reaches the belay device, brake by pulling the rope back down held by the brake hand. This creates friction between the rope and the device, which will keep the climber in place. Then, the guiding hand is placed under the brake hand. Finally, slide the brake hand back up to its original position before replacing the guiding hand above the belay device. This may be confusing at first, but the more you practice, the easier it is!
Important: Always pay attention to the climber! If the climber appears to be falling, get rid of all slack and move to the brake position.

Step Four: Coast
Finally, the belayer must lower the climber slowly and carefully. Once in the brake position with all slack removed, the belayer will let the rope slide through the belay device. This will lower the climber and allow them to “coast” down the wall.
There you have it! You officially know how to belay! Now get climbing!
Written by: Caitlin Rose
Edited by: Great Gessert
Photos from: Moosejaw (harness), Baylor (wall), REI (climbing & belay device)